使用脚本便捷地在 Ubuntu 中安装最新 Linux 内核
| 2015-09-15 10:36:00 评论: 5

想要安装最新的Linux内核吗?一个简单的脚本就可以在Ubuntu系统中方便的完成这项工作。
Michael Murphy 写了一个脚本用来将最新的候选版、标准版、或者低延时版的内核安装到 Ubuntu 系统中。这个脚本会在询问一些问题后从 Ubuntu 内核主线页面 下载安装最新的 Linux 内核包。
通过脚本来安装、升级Linux内核:
1、 点击这个 github 页面 右上角的 “Download Zip” 来下载该脚本(注:此脚本在墙外,我已经搬运回来了,请参见下面。)。
2、鼠标右键单击用户下载目录下的 Zip 文件,选择 “在此展开” 将其解压。
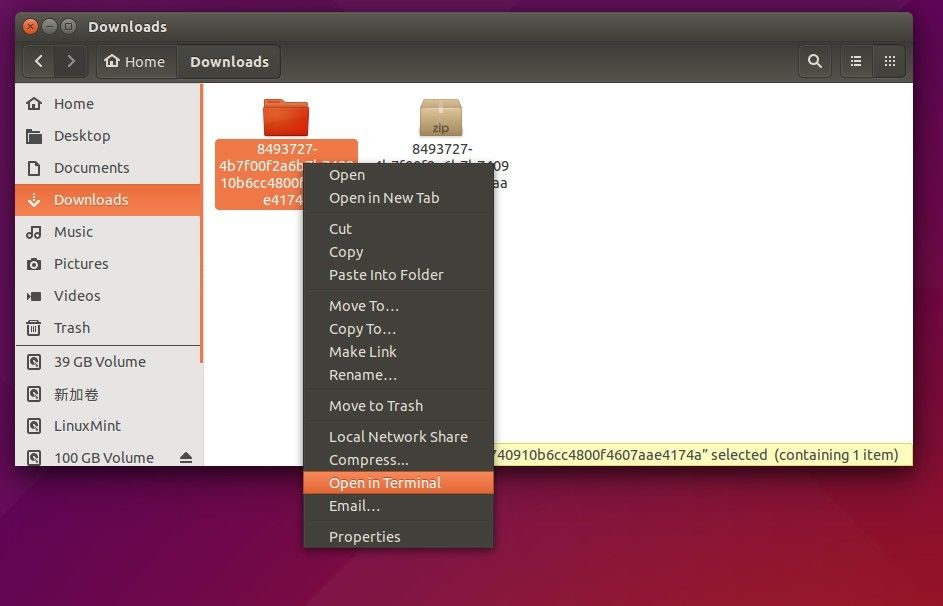
3、右键点击解压后的文件夹,选择 “在终端中打开” 到此文件夹下。

此时将会打开一个终端,并且自动导航到目标文件夹下。如果你找不到 “在终端中打开” 选项的话,在 Ubuntu 软件中心搜索安装 nautilus-open-terminal ,然后重新登录系统即可(也可以再终端中运行 nautilus -q 来取代重新登录系统的操作)。
备注:此脚本如下,你可以将它保存为一个可执行的 shell 脚本:
#!/bin/bash
cd /tmp

if ! which lynx > /dev/null; then sudo apt-get install lynx -y; fi

if [ "$(getconf LONG_BIT)" == "64" ]; then arch=amd64; else arch=i386; fi

function download() {
   wget $(lynx -dump -listonly -dont-wrap-pre $kernelURL | grep "$1" | grep "$2" | grep "$arch" | cut -d ' ' -f 4)
}

# Kernel URL
read -p "Do you want the latest RC?" rc
case "$rc" in
   y* | Y*) kernelURL=$(lynx -dump -nonumbers http://kernel.ubuntu.com/~kernel-ppa/mainline/ | tail -1) ;;
   n* | N*) kernelURL=$(lynx -dump -nonumbers http://kernel.ubuntu.com/~kernel-ppa/mainline/ | grep -v rc | tail -1) ;;
   *) exit ;;
esac

read -p "Do you want the lowlatency kernel?" lowlatency
case "$lowlatency" in
   y* | Y*) lowlatency=1 ;;
   n* | n*) lowlatency=0 ;;
   *) exit ;;
esac

# Download Kernel
if [ "$lowlatency" == "0" ]; then
   echo "Downloading the latest generic kernel."
   download generic header
   download generic image
elif [ "$lowlatency" == "1" ]; then
   echo "Downloading the latest lowlatency kernel."
   download lowlatency header
   download lowlatency image
fi

# Shared Kernel Header
wget $(lynx -dump -listonly -dont-wrap-pre $kernelURL | grep all | cut -d ' ' -f 4)

# Install Kernel
echo "Installing Linux Kernel"
sudo dpkg -i linux*.deb
echo "Done. You may now reboot."- 当进入终端后,运行以下命令来赋予脚本执行本次操作的权限。
chmod +x *
最后,每当你想要安装或升级 Ubuntu 的 linux 内核时都可以运行此脚本。
./*

这里之所以使用 * 替代脚本名称是因为文件夹中只有它一个文件。
如果脚本运行成功,重启电脑即可。
恢复并且卸载新版内核
如果因为某些原因要恢复并且移除新版内核的话,请重启电脑,在 Grub 启动器的 高级选项 菜单下选择旧版内核来启动系统。
当系统启动后,参照下边章节继续执行。
如何移除旧的(或新的)内核:
- 从 Ubuntu 软件中心安装 Synaptic Package Manager。
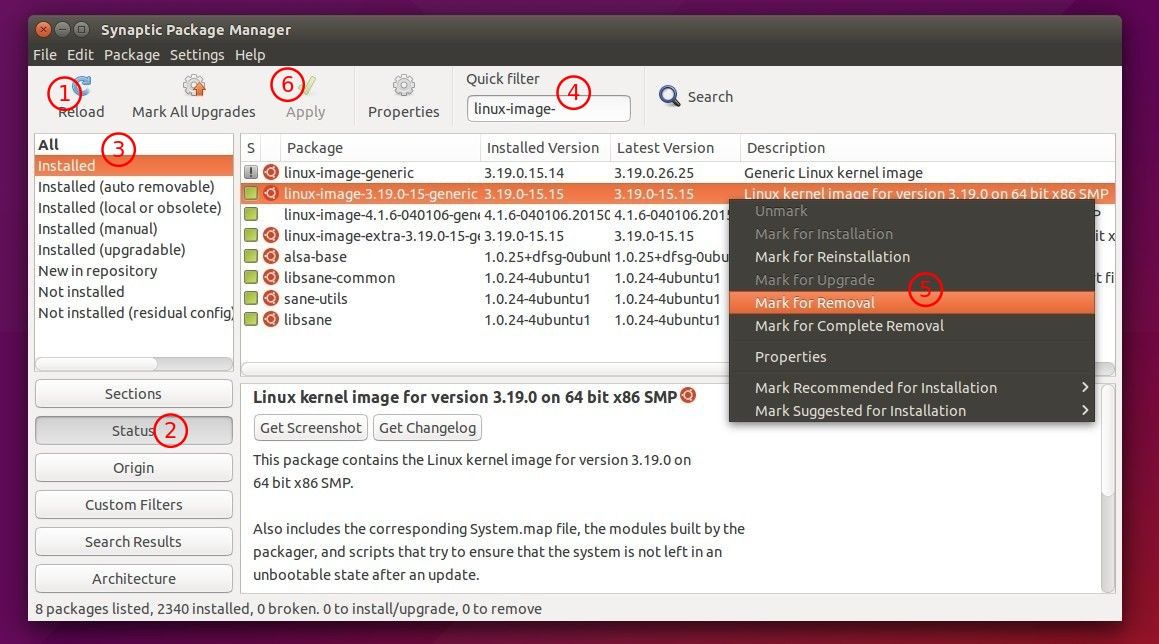
- 打开 Synaptic Package Manager 然后如下操作:
- 点击 Reload 按钮,让想要被删除的新内核显示出来.
- 在左侧面板中选择 Status -> Installed ,让查找列表更清晰一些。
- 在 Quick filter 输入框中输入 linux-image- 用于查询。
- 选择一个内核镜像 “linux-image-x.xx.xx-generic” 然后将其标记为removal(或者Complete Removal)
- 最后,应用变更

重复以上操作直到移除所有你不需要的内核。注意,不要随意移除此刻正在运行的内核,你可以通过 uname -r 命令来查看运行的内核。
对于 Ubuntu 服务器来说,你可以一步步运行下面的命令:
uname -r

dpkg -l | grep linux-image-

sudo apt-get autoremove KERNEL_IMAGE_NAME


- linux [Chrome 45.0|Mac 10.10] 2015-09-16 21:15
- 已经搬运回来啦。
- linux [Chrome 45.0|Mac 10.10] 2015-09-16 21:09
- 呃,这个脚本是被万恶的墙给挡了。。我来想想办法。
- 来自河南郑州的 Safari 8.0|Mac 10.10 用户 2015-09-16 20:18
- 终于能省点劲了,其实内核更新本就不复杂
- 艾薇儿 [Chrome 31.0|Windows 8.1] 2015-09-16 10:50
- 链接访问不了
- 艾薇儿 [Chrome 31.0|Windows 8.1] 2015-09-16 10:43
- 方便是很方面但是。。。新手求助。。。下载脚本的链接,没找脚本。。。